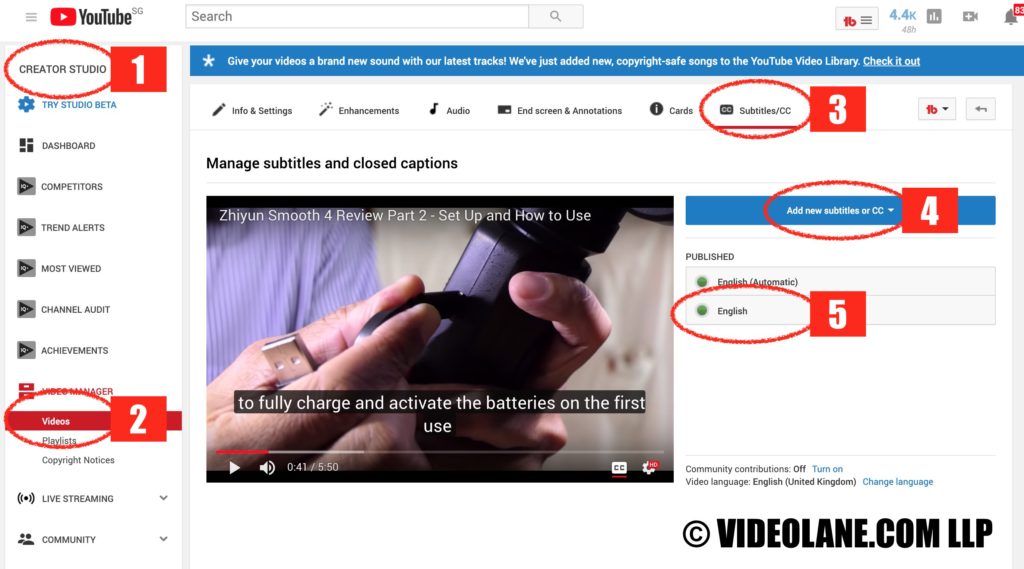
This comprehensive documentation will help you add subtitles to your own videos online.
Uploading the video and the script
- Upload your video to your YouTube account in Private mode.
- Switch to Classic Creator Studio. (Right now the new YouTube Studio Beta Is missing the captioning feature)
- Go to the video and select the “Subtitles/CC” Tab.
- Select “Add new subtitles or CC”.
- Choose “English”.
- Click on “Transcribe and auto-sync”.
- Copy and paste script text into the box that says “Type what’s spoken here”. (The client has a script typed out in a document but the spoken words in the video is a little bit different. The script is useful when it comes to technical jargon.)
- Click on “Set timings”.
- Wait for about 10 minutes for YouTube to process.
- Refresh the page to check if the process is done.
Checking and correcting the captions
- When the process is done, click on “Published > English”.
- If it is not in edit mode click on “Edit”.
- Playback the video and check to make sure the caption text matches the spoken words.
- If something is not right, correct the text and adjust the timings.
- Keep doing this till the end of the video. Then click on “Save Changes”.
Some of my valuable notes and tips
- Note: A 3-minute clip may take 15 minutes of work. That means the work takes about 5x the length of the video.
- Tip: For efficiency, do the first round of checking and correcting without replaying any sentence. We will replay on the second round of checking.
- Note: The second round of checking and correction takes about 1.5x the length of a video. That is 15 minutes of work for a 10-minute clip.
- Tip: Copy and paste the script into Grammarly app to check for spelling, grammar, and punctuation.
- Tip: Copy and paste the script into a Text Editor to find and replace brackets or unwanted characters.
- Note: I discovered that using a Windows touchscreen laptop with a stylus pen increases the speed of my work instead of dragging the cursor to and fro with a mouse or a touchpad.
- Note: Also, using speech recognition instead of keyboard typing gets things done quicker.
Checking it twice to make it nice
- Go back to the video in Creator Studio.
- Go to the “Subtitles/CC” Tab again.
- Select “English” and then “Edit”.
- Playback, check and correct once more. This time a little bit faster.
- Click on “Save Changes” when done.
Downloading the Caption text or SRT file
Okay. The client will not be using YouTube. Instead, they will be putting the videos into other platforms which require closed captions or subtitles. I am just using YouTube as a tool to generate the closed captions. The generated closed caption files are basically text files that end with “.SRT”.
- Once again go to “Published” and then select “English”.
- Click on “Actions” and then select “.srt”.
- The SRT file will then be downloaded into your computer.
Checking the SRT file for accuracy
- Look the “captions.srt” file in your download folder on your computer.
- Rename the file and move it to the project folder, to stay organized
- Right-click on the file and Open it with Notepad (PC) or TextEdit (Mac).
- Check the text for spelling error again
- Tip: Use Grammarly. Just copy and paste the text into Grammarly. Note and verify the mistakes. Then make corrections on the SRT text file.
- Split long single lines to two shorter lines, if overlooked during the correcting phase.
- Save the changes if any. The “.srt” file is ready for delivery.
As you can see, it takes a lot of work to transcribe and caption other people’s video. It is also language specific and the person doing this work has got to be proficient in the language.
I am going to bookmark this post as a reference for a similar closed captioning assignment that I may be doing in future.
Feel free to reply with a question or comment.
See all my posts about Subtitles here…
https://www.videolane.com/?s=subtitle
Adrian Lee
VIDEOLANE.COM
PS: Join the next Video Making Class for BEGINNERS in Singapore…
→ https://www.videolane.com/courses/basic-videography/
Join 5640 subscribers…
SUBSCRIBE TO MY YT CHANNEL → https://www.youtube.com/c/videolane?sub_confirmation=1
Connect with Me On…
Facebook → http://facebook.com/videolane
Instagram → http://instagram.com/adrianvideoimage
Twitter → https://twitter.com/adrianlee


I am just using YouTube as a tool to generate the closed captions. Amazing post and comprise long post in small and covered all important points.
Thanks for reading.
Hey, I am very much impressed by your article because it contains very unique tips and tricks to add subtitles to youtube. Thanks a lot for sharing the useful article.